Getting started
This guide will quickly step you through the installation, creation of a project and viewing mzML/mzXML files.
Installation
Download the latest release for your platform from GitHub.
-
- It is preferable to install BatMass to non-system locations (e.g. not into Program Files or similar locations) as you might need Administrator privileges to modify the configuration file.
Note
If you select the platform independent version, you'll have to launch BatMass by manually running the correct executable for your platform from <extracted-archive-path>/bin/.
Configuration
You can skip this section if you can launch the application and view the files without problems.
The only two things you might want to configure are the maximum amount of memory, that BatMass will be allowed to use and the path to JRE (Java Runtime Environment). The default amount of RAM is set to 4GB, if your machine doesn't have that much, the JVM won't start.
The startup configuration is stored in <batmass-install-path>/etc/batmass.conf.
- Max memory is set up in
default_optionsoption, the flag is-J-Xmx. By default after installation you'll find that it is set to-J-Xmx4G - You can set any standard JVM startup options using this
default_optionsline, just prepend the arguments with-J-. E.g.-J-DisableExplicitGC, however you likely won't need that. - If you get a message that the JRE can't be found, try explicitly specifying the full path using the
jdkhomeoption ofbatmass.conf. Even though the name saysjdk, it's actually the path to the JRE. The line with that option is commented out by default, so remove the#symbol at the beginning of the line and set the path, e.g.jdkhome="C:\Program Files\Java\jre1.8.0_77"
Note to Windows users
If you've isntalled BatMass into some system folder (most commonly C:\Program Files\batmass), you might need to run text editor as Administrator in order to edit the config file, otherwise you likely won't be able to save changes to batmass.conf.
Creating a project
Go to Main menu -> New project, select any project type when presented with a choice, it won't matter now. Choose an existing directory or create a new empty one for the project, all the project-related files will be created inside this directory and not a new directory with the project name under the selected directory.
The project should now appear in the Project Explorer tab on the left. Expand the project's node and right click LC/MS Files node, choose Import LC/MS Files. You can select multiple files at once by holding Shift or Ctrl, you can also restrict the files that are being shown to a particular format using the drop-down menu on the bottom of the file-chooser.
Memory usage
For opening large LC/MS runs in Map 2D viewer BatMass requires enough memory to load the whole MS level in memory (MS1 or MS2 or a single ‘swath’/‘window’ of MS2 in case of DIA), the default configuration file is set to use 4GB of RAM maximum. This has two implications:
- If your machine does not have enough available RAM you might not be able to run the program at all. E.g. MS1 only run of 10GB on a machine with 4GB RAM (You should still be able to view spectra though).
- To open larger experiments (multi-gigabyte mzML/mzXML files) you might want to set larger memory limit in the configuration file discussed above.
Viewer controls
Open one of the files in the 2D viewer by right clicking and View -> 2D Map as shown below.

File parsing might take some time, when it's done you should see something akin to the following.
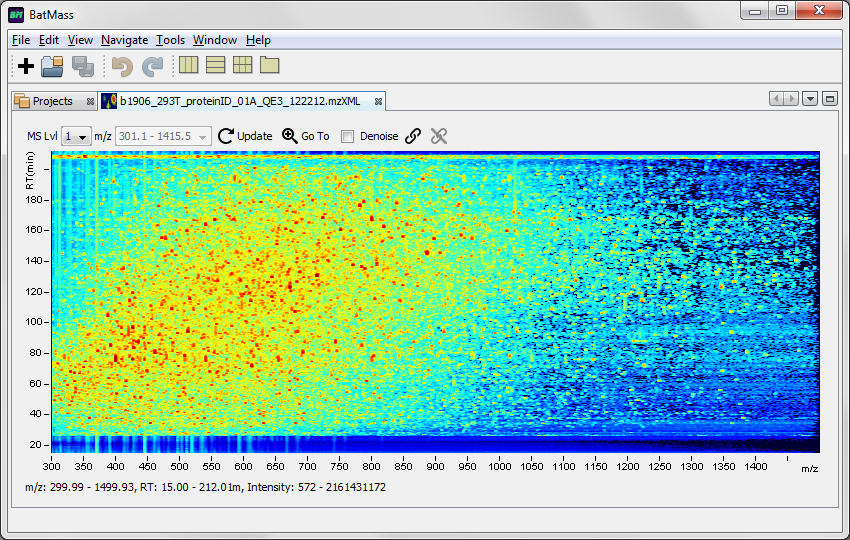
The image can be zoomed and panned using the mouse and keyboard.
- Drag to zoom. Press the left mouse button (
LMB) and drag. - Zoom in/out with mouse wheel. Using the mouse wheel with Shift or Alt modifiers will restrict zooming to only m/z or RT direction (the mnemonic rule is that the Shift key is streched out horizontally, so it corresponds to m/z direction, which is horizontal in charts).
- Go To Dialog. If you are interested in a particular location, you can use this dialog to type in the coordinates. While a chart has focus, press Ctrl+G or click the magnifying glass icon
 .
. - Panning. Hold Ctrl while dragging the mouse to pan the view.
- Restricted panning. Using the same modifier keys (Shift or Alt) panning can be restricted to only one direction.
- Zoom out to original full overview. Ctrl+Alt+Shift+
LMB clickwill un-zoom the image completely, bringing you to the view of the whole experiment. - If you accidentally zoom to wrong location use the
Undobutton in the main toolbar. - If you are viewing DIA (Data Independent Acquisition) data, the toolbar of the 2D viewer should have drop-down menus for MS level and precursor windows in case of MS2. After you change the MS level or precursor window in the drop-down, you'll need to click the Refresh icon
 .
.
Linking viewers
Multiple viewers can be linked together by dragging and dropping the link icon ![]() from the viewer toolbar to another viewer's link icon. You can do this for multiple viewers of different types to assemble thme into groups. Clicking on the link icon will highlight the other viewer windows which are currently in in the same linked group, i.e. all synchronized, their borders will be highlighted by the same color. By clicking the unlink button in the viewer's toolbar
from the viewer toolbar to another viewer's link icon. You can do this for multiple viewers of different types to assemble thme into groups. Clicking on the link icon will highlight the other viewer windows which are currently in in the same linked group, i.e. all synchronized, their borders will be highlighted by the same color. By clicking the unlink button in the viewer's toolbar ![]() , you can remove viewers from the group.
, you can remove viewers from the group.